Time for one more espresso brewing tutorial. This time we’re going to make iced espresso with a Chemex. The Chemex is a well-liked pour espresso brewer, which we lined intimately within the article Chemex Espresso Brewing – Historical past and Tutorial. Along with making nice scorching espresso, the Chemex does a stellar job of constructing iced espresso.
Earlier than we bounce into the tutorial, I need to briefly clarify how iced espresso isn’t the identical factor as chilly brew espresso. Chilly-brew espresso which has been surging in reputation lately takes about 24 hours to make. Iced espresso is totally different. It simply takes the identical period of time it usually takes to make scorching espresso. Iced espresso ought to style as vivid and as flavorful as the recent model with out being weak and watery. Iced espresso excels at preserving the identical taste traits discovered within the common brewed scorching model. Chilly brew will create a low acidity profile and be a lot larger in caffeine.
The massive theme with making iced espresso is the water used will come from each the recent brewing water and ice cubes. A smaller quantity of scorching water will go by means of the espresso grounds. Because the espresso brews, it’s going to fall onto the ice cubes. The result’s the ice will principally be melted, however the drink can be chilled and never style weak or watered down. With the Chemex, the brew time for iced espresso is corresponding to the recent model. In case you are fascinated by a slow-drip iced espresso, take a look at our Chilly Brew Dripper Tutorial.
Step by Step Iced Chemex Brewing
For this tutorial, we’re going to use the 6-cup Chemex. You probably have the 3-cup, use half the espresso, scorching water, and ice of this recipe.
Elements and Water Math
Moreover the Chemex, you will have:
- 50 grams of espresso
- 466 grams of water
- 234 grams of ice
- Chemex filter
- digital scale (beneficial)
Our brewing ratio can be 14:1, which implies 14 elements of water to 1 a part of water. This ratio is a bit of stronger than the 17:1 we use for warm Chemex.
What if you happen to don’t have a scale? Wing it. A common rule is you need 1/3 of the water you’ll usually use to be added first as ice cubes. For the 6-cup brewer, this implies the cubes can be larger than the place the brewer curves again up.

#1 Warmth Water
You have to sufficient water for each the recent water portion of the brew and likewise sufficient to completely rinse the Chemex paper filter.
#2 Rinse Filter
The Chemex makes use of a thick paper filter, which might impart a paper-like style to the espresso. The way in which to keep away from that’s to offer it a superb rinse first. Not like different brewing strategies during which a fast splash of water is sufficient, the Chemex wants an extended rinse. Purpose for 5-10 seconds.
As soon as the rinse is full, place the filter apart and dump the rinse water. At this level, give the Chemex a fast rinse with chilly water. If we have been brewing a standard scorching Chemex, we wouldn’t do that step, to retain extra warmth on the glass.
#3 Add Ice to the Chemex
Place 234 grams of ice into the bottom of the Chemex.

#4 Place Filter on Chemex and Add Floor Espresso
Now that the ice is within the Chemex, return the filter to the highest of the Chemex. Place 50 grams of floor espresso into the filter. Use a medium-coarse grind, which is in between a standard drip and a French press grind. See our Espresso Grind Chart for visible steerage.
#5 Slowly Pour Sizzling Water over the Espresso Grounds
The new water pour is identical as we use on a scorching brew, solely we’re pouring much less scorching water. From our Chemex Espresso Brewing tutorial:
As soon as the water reaches boil, take away it from the warmth supply and let it cool 20-30 seconds earlier than pouring.
The preliminary pour is essential. As a substitute of pouring all of the water onto the grounds as you’ll with a press pot, solely pour sufficient water to saturate the beans. Chemex states that wetting the grounds permits them to “bloom”. The significance of this step is to get all of the espresso in touch with water. After you moist the grounds wait 20-40 seconds. Throughout this time trapped carbon dioxide (CO2) escapes from the grounds.
When you can see areas the place the espresso is clumping and never making contact with the water, you should use a wood spoon to offer the brew a fast stir. That is non-compulsory. We can be including 466 grams of water in whole. Having a kettle with a gooseneck spout makes this job simple.

#6 Take away Filter and Serve
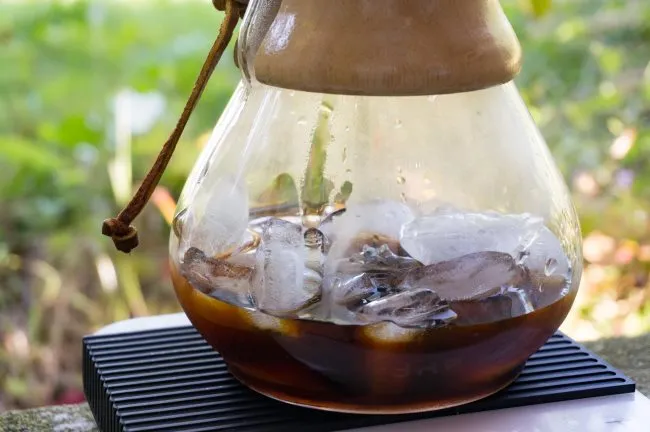
As soon as the water has completed passing by means of the espresso and filter, take away the filter. At this level, the ice ought to be principally or absolutely melted. The espresso ought to be chilly. If you need, you’ll be able to add ice to your glass earlier than serving espresso. The ice will preserve the espresso chilly so you’ve got much more time to sip on the beverage earlier than it begins to water down.

Final Phrases
We’ve one other tutorial that makes use of a Intelligent Espresso Brewer to make Iced Espresso. That’s nonetheless my favourite iced espresso brewing methodology, nevertheless, the bigger Chemex sizes (6-cup and 10-cup) are finest for making bigger batches of iced espresso. If I’m simply making an iced espresso for myself, I seize the Intelligent, nevertheless for family and friends, I take advantage of the Chemex.
Sources
Chemex Espresso Brewing – Historical past and Tutorial – INeedCoffee tutorial.
Intelligent Espresso Brewer to Make Iced Espresso – INeedCoffee tutorial.
Brewing images by Joseph Robertson of Extracted Journal, a digital espresso journal revealed for iOS and Android.